Gates! The first impression it makes is “way to enter somewhere”. But, in reality, the primary responsibility of a gate is to prevent unwanted entry. Another perspective of thinking about gates is – different gates will take you to different places.
Laravel picked this word, “Gate” to name its basic authorization system. What a beautiful similarity between the purpose of an authorization system and the real life gates!

In this post, we are going to:
- Take a simple application as an example scenario.
- Identify the usages of authorization in this application.
- And then, how we can solve it using Laravel Gates.
What is Authorization, BTW?
In a software system, Authorization is a process/system/function of specifying access-rights or privileges to resources. In simple terms, we can say, resources are the things and people that a software deals with. And the privileges are the actions that someone may take on those resources. For example, in a news publishing system, the News or Article is a resource and Create, Edit, Publish, Visit etc. are the privileges that a user may have on this resource.
An authorization system is a tool or process that grants/allows privileges to an actor (i.e. user or system) and verifies these privileges when trying to apply these rights. Laravel Gates is a simple authorization system that provides an easy process to define authorizations.
An example scenario
We, the software guys, commonly use some kind of ticketing or issue tracking systems. It’s a well known domain for all of us. So let’s take it as the example scenario – a ticketing module.
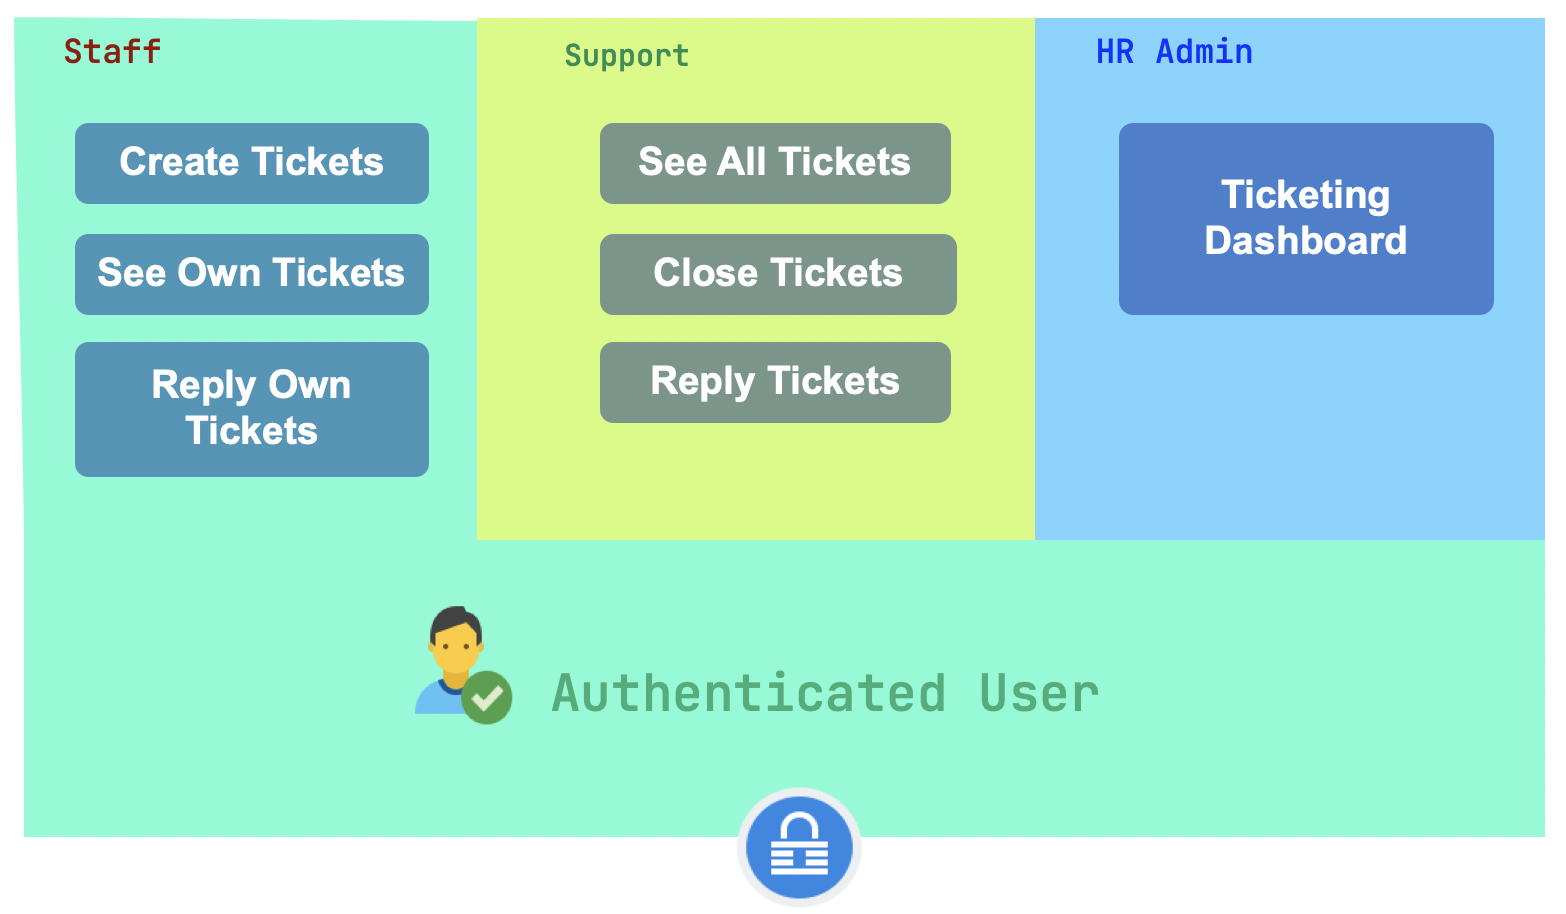
In our HR software, we are going to develop a ticketing module for the company’s internal support. Using this module, staff can raise tickets for various queries and requests. The HR department has assigned support personnels to check, reply and close these tickets. This module has the following requirements:
- Any logged in staff can create new tickets.
- Any staff member can see and reply to his own tickets.
- The support staff can see all tickets.
- The support staff can reply to and close any ticket.
- The HR Admin can see ticketing dashboard – a statistical overview of raised and closed tickets.
We can visualize the module features as the following diagram:
Authorization in our Ticketing Module
As we can see in the above diagram, some features are available for any authenticated user (which is part of authentication). Some other features require special permissions or access rights above just being authenticated. For example, any logged in user can create and see his own tickets. But, to see and reply to everyone’s tickets, the logged in user needed to be a “Support staff”.
We can visualize it like this – by logging in, the user has entered a secured yard. Some features are placed openly in this yard – so he can now access them. But some other features are placed in some entry restricted blocks in the yard. To access these special areas, users have to meet certain criteria.
So, how can we manage the user’s entry in those restricted areas? We can place some gates between the open yard and the restricted blocks. Also, we need to appoint a gatekeeper in front of each gate. He will verify if the user meets the requirements to enter the area. If the criteria meets, he will allow the user to get in and access the features inside.

In the above visualization, we have placed two gates in front of two restricted blocks and named them provide_ticket_support and see_ticket_dashboard . Also placed a robot gatekeeper for each gate.
Now, let’s see how we can implement this idea in Laravel and program our robot gatekeeper to control the entry of restricted areas.
Implement authorization logic using Laravel Gates
Defining a gate to check user’s ability or permission
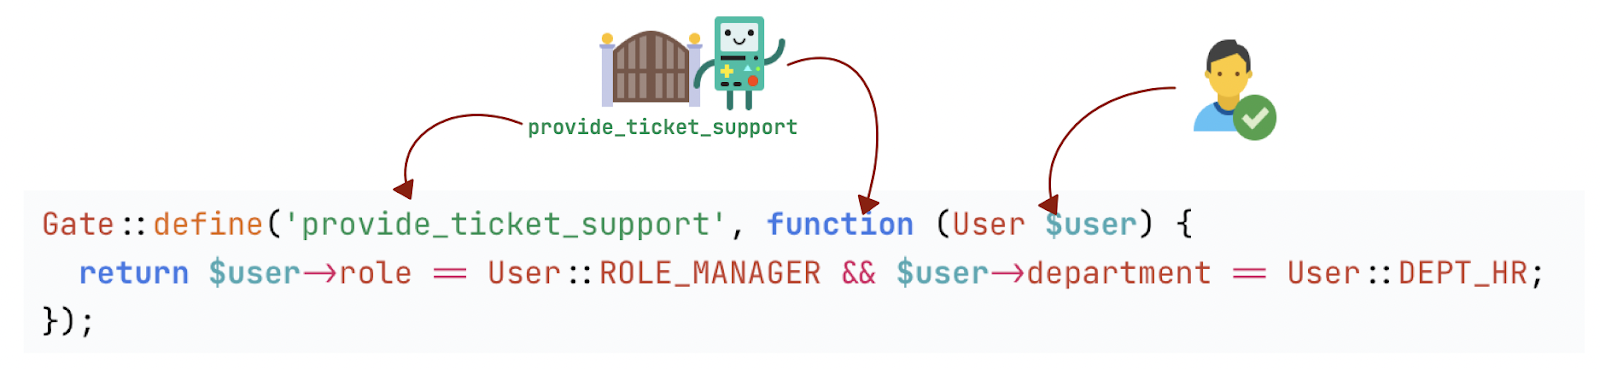
Defining a gate in Laravel is straightforward. A gate will have a name of the ability/permission we want to check, and a closure that returns a boolean. Let’s make a gate to check if the logged in user can provide_ticket_support .
- Open the file
app/Providers/AuthServiceProvider.phpand go toboot()method. - After the line
$this->registerPolicies();add a gate using Gate facade.
Gate::define('provide_ticket_support', function (User $user) {
  // Do whatever you need to verify if the user is allowed to "provide_ticket_support".
  return $user->role === User::ROLE_MANAGER && $user->department === User::DEPT_HR;
});
You can now easily construct an analogy with the idea we discussed in previous diagram –
- The ability/permission (i.e. provide_ticket_support) is the name of the gate .
- The closure function is the program we install in our gateman robot
- When the Authenticated user will ask to enter the gate, the gateman will respond with yes/no (boolean) .
If you’ve got the syntax of defining Laravel Gate, you can now define another gate for see_ticket_dashboard too. 😉
Using the Gate in blade view files
Let’s assume, you have 3 sub-menu items under tickets in your application top navigation – Dashboard, My Tickets and All Tickets. But everyone should not see all these menu items. We need to show the menu items conditionally based on user’s permission. So, according to the authorization requirement –
- My Tickets – List of user’s own tickets – should be visible to any logged in user.
- All Tickets – List of all tickets from all users. This feature is placed inside another restricted area. Users need to be able to enter through the Gate named provide_ticket_support to access this.
- Dashboard – This is placed inside another restricted area. And needs to be able to pass the Gate see_ticket_dashboard to see this page.

Laravel provides some directives to check if user is authorized to enter a gate. We can use them to conditionally display a link, a button or any portion of a view. We can use @can to conditionally show the menu items according to the above plan.
@can('see_ticket_dashboard')
 <li class="nav-item"><a class="nav-link" href="{{ route('ticket-dashboard') }}">Dashboard</a></li>
@endcan
@can('provide_ticket_support')
 <li class="nav-item"><a class="nav-link" href="{{ route('all-tickets') }}">All Tickets</a></li>
@endcan
<li class="nav-item"><a class="nav-link" href="{{ route('my-tickets') }}">My Tickets</a></li>
Preventing unauthorized access in Controller
Do we really need this?
Okay, so we are now controlling which menu items to show for which user based on their access rights. But, what if the role of a user has changed? And he already has bookmarked some links that were visible for his previous role, but not appropriate for current position? He will be able to access the page as he has the links, right?
This is a vulnerability that may lead to unexpected behavior and security threats. To prevent this scenario, we need to add a second layer of check in the controller.
Using Gate in Controller
Again, the gates we already have defined can help. Let’s say, if someone is not authorized to see the dashboard, we just want to respond with a “403 – Unauthorized” response.
The following line as the first line in the controller method should be sufficient for this.
Gate::authorize('see_ticket_dashboard');
// The user is eligible for see_ticket_dashboard area - go ahead
But if we want more control, for example, want to redirect the user to somewhere else, we can use the Gate::allows() method.
if (!Gate::allows('see_ticket_dashboard')) {
  return redirect('/somewhere/else');
}

// Do other things - prepare data and display the dashboard
Authorization with specific Resource / Model
There are situations where we need to take the subject of permission into consideration when defining a Gate. For example, who can reply to a ticket in our example scenario?
- Any user who can
provide_ticket_support. - The user who has raised the ticket – role doesn’t matter in this case.
So, if we try to define a gate to check who can reply_ticket, we’ll require the ticket entity along with the user to check the creator of the ticket. Laravel Gate allows us to pass additional context to gate functions to handle these cases.
Let’s define our new gate reply_ticket.
Gate::define('reply_ticket', function (User $user, Ticket $ticket) {
    return Gate::allows('provide_ticket_support') || $user->id === $ticket->user_id;
});
We have to supply the $ticket when using the gate as an additional argument. For example, in the view files, we can display the reply form like this:
@can('reply_ticket', $ticket)

<form id="reply-ticket" method="POST" action="...">
    <!-- form fields for submitting reply -->
</form>

@endcan
Similarly, the first line of the controller method can be:
Gate::authorize('reply_ticket', $ticket);Note: In Gate-related blade directives and Gate Facade methods, the current user will be automatically passed. But you need to manually supply additional arguments, if any.
Done! We have securely implemented the example scenario we have planned. 😎
Other Laravel Gate features you should know about
A few more points that we didn’t discuss in implementing the above scenario, but you should be aware of. This will help you to choose right option in times.
- Gates can be used with middleware too. For example:
Route::get('/update/tickets/{ticket}', 'TicketController@edit')
->middleware('can:update_ticket,ticket');- There are a good number of methods in Gate Facade for using in different scenarios including:
| Method | Purpose/Description |
| allows | Check if user have the given permission |
| denies | Check if user DO NOT have the given permission |
| check | Checks if a single or array of permissions are allowed |
| any | Checks if at least one permission from an array is allowed. |
| none | Checks if none of the array of permission is allowed. |
| authorize | Throws AuthorizationException unless the permission is allowed |
Find them all here.
Also there are blade directives for similar purposes like @can, @cannot, @canany etc.
- Similar to controller methods, Gate methods also can be defined in class and referred as callback in definition.
Gate::define('update-ticket', [TicketAuthorization::class, 'update']);- You may use another, previously defined gate in gate definition. We did it in defining
reply_ticketabove. - Need to approve all the authorization for a user? Want to block everything (e.g. for banned users)?
Gate::before()andGate::after()methods are here to help. They’ll be called before/after any other authorization checks. If it returns a non-null value, that would be used as the authorization check result. And, you may define any number of before/after callbacks.
Gate::before(function ($user, $ability) {
    if ($user->isBanned()) {
        return false;
    }
});
See details here.
Last’s close the gate for today 👋
It was only a single entity – Ticket in our example. Let’s think of a real world application where you may have 20, 40, or 100s of entities. And we’d be required to define various types of permissions for them. Can you imagine how cumbersome and unmaintainable that can become if we try to define them with 1000s of Gate::define() in AuthServiceProvider? This is where Policy comes into play. I was thinking of writing another detailed, step by step guide on using Laravel Policy. Should I?
If you find this article useful, you may follow me on twitter(@ajaxray) and subscribe my newsletter {BetweenCurlyBrackets} for future contents on Laravel, PHP and web application development.
Thanks you! 🤗