
Maker-Checker (also known as the four-eyes principle) is a widely used workflow for approving sensitive and impactful actions. It’s a control mechanism that requires two different individuals to complete a task. In simple terms, Maker-Checker Workflow is a process where an individual creates or produces content (maker), then another personnel (checker) reviews and verifies its accuracy before publishing or approving it. This process ensures that the content meets quality standards and is reliable.
Let’s take a simple scenario to make a Maker-Checker approval workflow in Laravel. Also, we’ll use Filament V3 for building the CRUD features for the entity with minimal effort. Once you get the core concept, you can build it inside any application – Filament is not essential.
Once you get the core concept, you can build it inside any application – Filament is not essential.
Example Scenario
In this tutorial, we’ll build a News Article publishing system with a maker-checker workflow using Laravel Filament v3. We’ll start with a basic News model and gradually add workflow functionality.
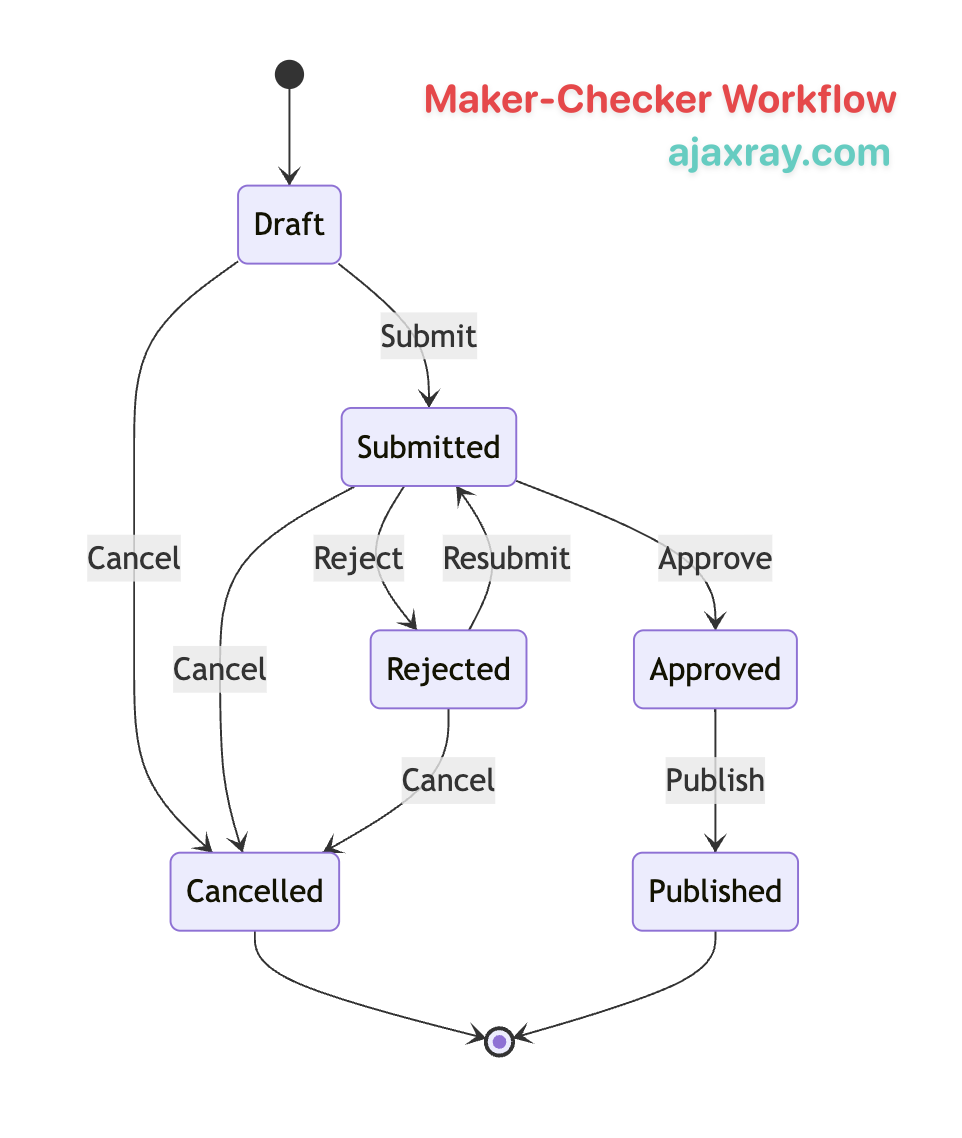
Think of it like a two-step review process, similar to how editors check written work for grammar and spelling errors before publication. We have two roles involved in this process – “reporter” and “editor“. Here is the workflow we want to build:
- Reporter creates new News article. It’s in
draftstate initially. - Reporter can submit it (
submitted) for review or cancel it (cancelled). - Editor will now review the article.
- Then, he’ll either approve it (
approved) or reject it (rejected). - Editor may also cancel the article (
cancelled) - If
rejected, Reporter can update it and submit again (submitted) - Editor can publish (
published) theapprovednews articles at appropriate time.
Prerequisites
I am assuming you’re a Laravel developer with basic understanding of OOP. Having some experience with Filament will make things a lot easier for you.
We will use Laravel Eloquent State Machine package to building the workflow. SO, overall we’ll need:
- Laravel 11.x
- Filament 3.x
- Laravel Eloquent State Machine
- Basic understanding of Laravel and Filament
- Basic understanding of composer
Step 1: Setting Up the Project
If you have a Laravel Filament project ready to experiment with, you may skip this step. Otherwise, let’s create a new Laravel 11 project and install Filament:
composer create-project laravel/laravel:^11.0 newsbox
cd newsbox
composer require filament/filament
php artisan filament:install --panels
Step 2: Creating the News Model and Migration
Let’s create a basic News model with essential fields:
php artisan make:model News -mEdit the migration file:
<?php
// database/migrations/yyyy_mm_dd_create_news_table.php

use Illuminate\Database\Migrations\Migration;
use Illuminate\Database\Schema\Blueprint;
use Illuminate\Support\Facades\Schema;

return new class extends Migration
{
    public function up()
    {
        Schema::create('news', function (Blueprint $table) {
            $table->id();
            $table->string('title');
            $table->text('body');
            $table->datetime('publish_date')->nullable();
            $table->string('status')->default('draft');
            $table->timestamps();
            $table->foreignId('created_by')->nullable()->constrained('users');
            $table->foreignId('updated_by')->nullable()->constrained('users');
        });
    }
};
Create the model. Beside defining fillables and casts, we will hook into the lifecycle events to automatically update the created_by and updated_by fields :
<?php
// app/Models/News.php

namespace App\Models;

use Illuminate\Database\Eloquent\Model;

class News extends Model
{
    protected $fillable = [
        'title',
        'body',
        'publish_date',
        'status'
    ];

    protected $casts = [
        'publish_date' => 'datetime',
    ];

    protected static function boot()
    {
        parent::boot();

        static::creating(function ($model) {
            $model->created_by = Auth::id();
            $model->updated_by = Auth::id();
        });

        static::updating(function ($model) {
            $model->updated_by = Auth::id();
        });
    }
}
⚠️ Note the status field – we’ll use it soon for maintaining the news workflow.
Add field for User role:
For this tutorial, we’ll just add a role field to the User model. We will use it for determining if a User is an editor or a reporter. In a real application, you may use different authentication methods or starter kits – so you need to adjust role checking accordingly.
<?php
// database/migrations/0001_01_01_000000_create_users_table.php

public function up(): void
{
    Schema::create('users', function (Blueprint $table) {
        // ... other fields ...
        $table->string('role')->default('reporter');
    });

    // ... keep everything else as is ...
}
Also add the new field in `$fillable` of the User model.
<?php
// app/Models/User.php

class User extends Authenticatable
{
    protected $fillable = [
        // ... other fields ...
        'role',
    ];

    // ... keep everything else as is ...
}
Finally, run the migration:
php artisan migrate:freshStep 3: Creating Basic Filament Resource
Let’s create a basic Filament resource for News articles. It’s one of the fastest way of building a CRUD functionality around a Model in Laravel:
php artisan make:filament-resource News --view
In case it’s your first meeting with Filament, Congratulations! 🥳
You are about to discover a beautiful world of fast and efficient app development. 🙌
Edit the resource file:
Now we can update the generated resource files to set our desired columns in the listing page and fields in the create/edit form. You may check this Resource Quickstart to have an overview or filament resources.
<?php
// app/Filament/Resources/NewsResource.php
namespace App\Filament\Resources;
use App\Filament\Resources\NewsResource\Pages;
use App\Models\News;
use Filament\Forms;
use Filament\Forms\Form;
use Filament\Resources\Resource;
use Filament\Tables;
use Filament\Tables\Table;
class NewsResource extends Resource
{
protected static ?string $model = News::class;
protected static ?string $navigationIcon = 'heroicon-o-newspaper';
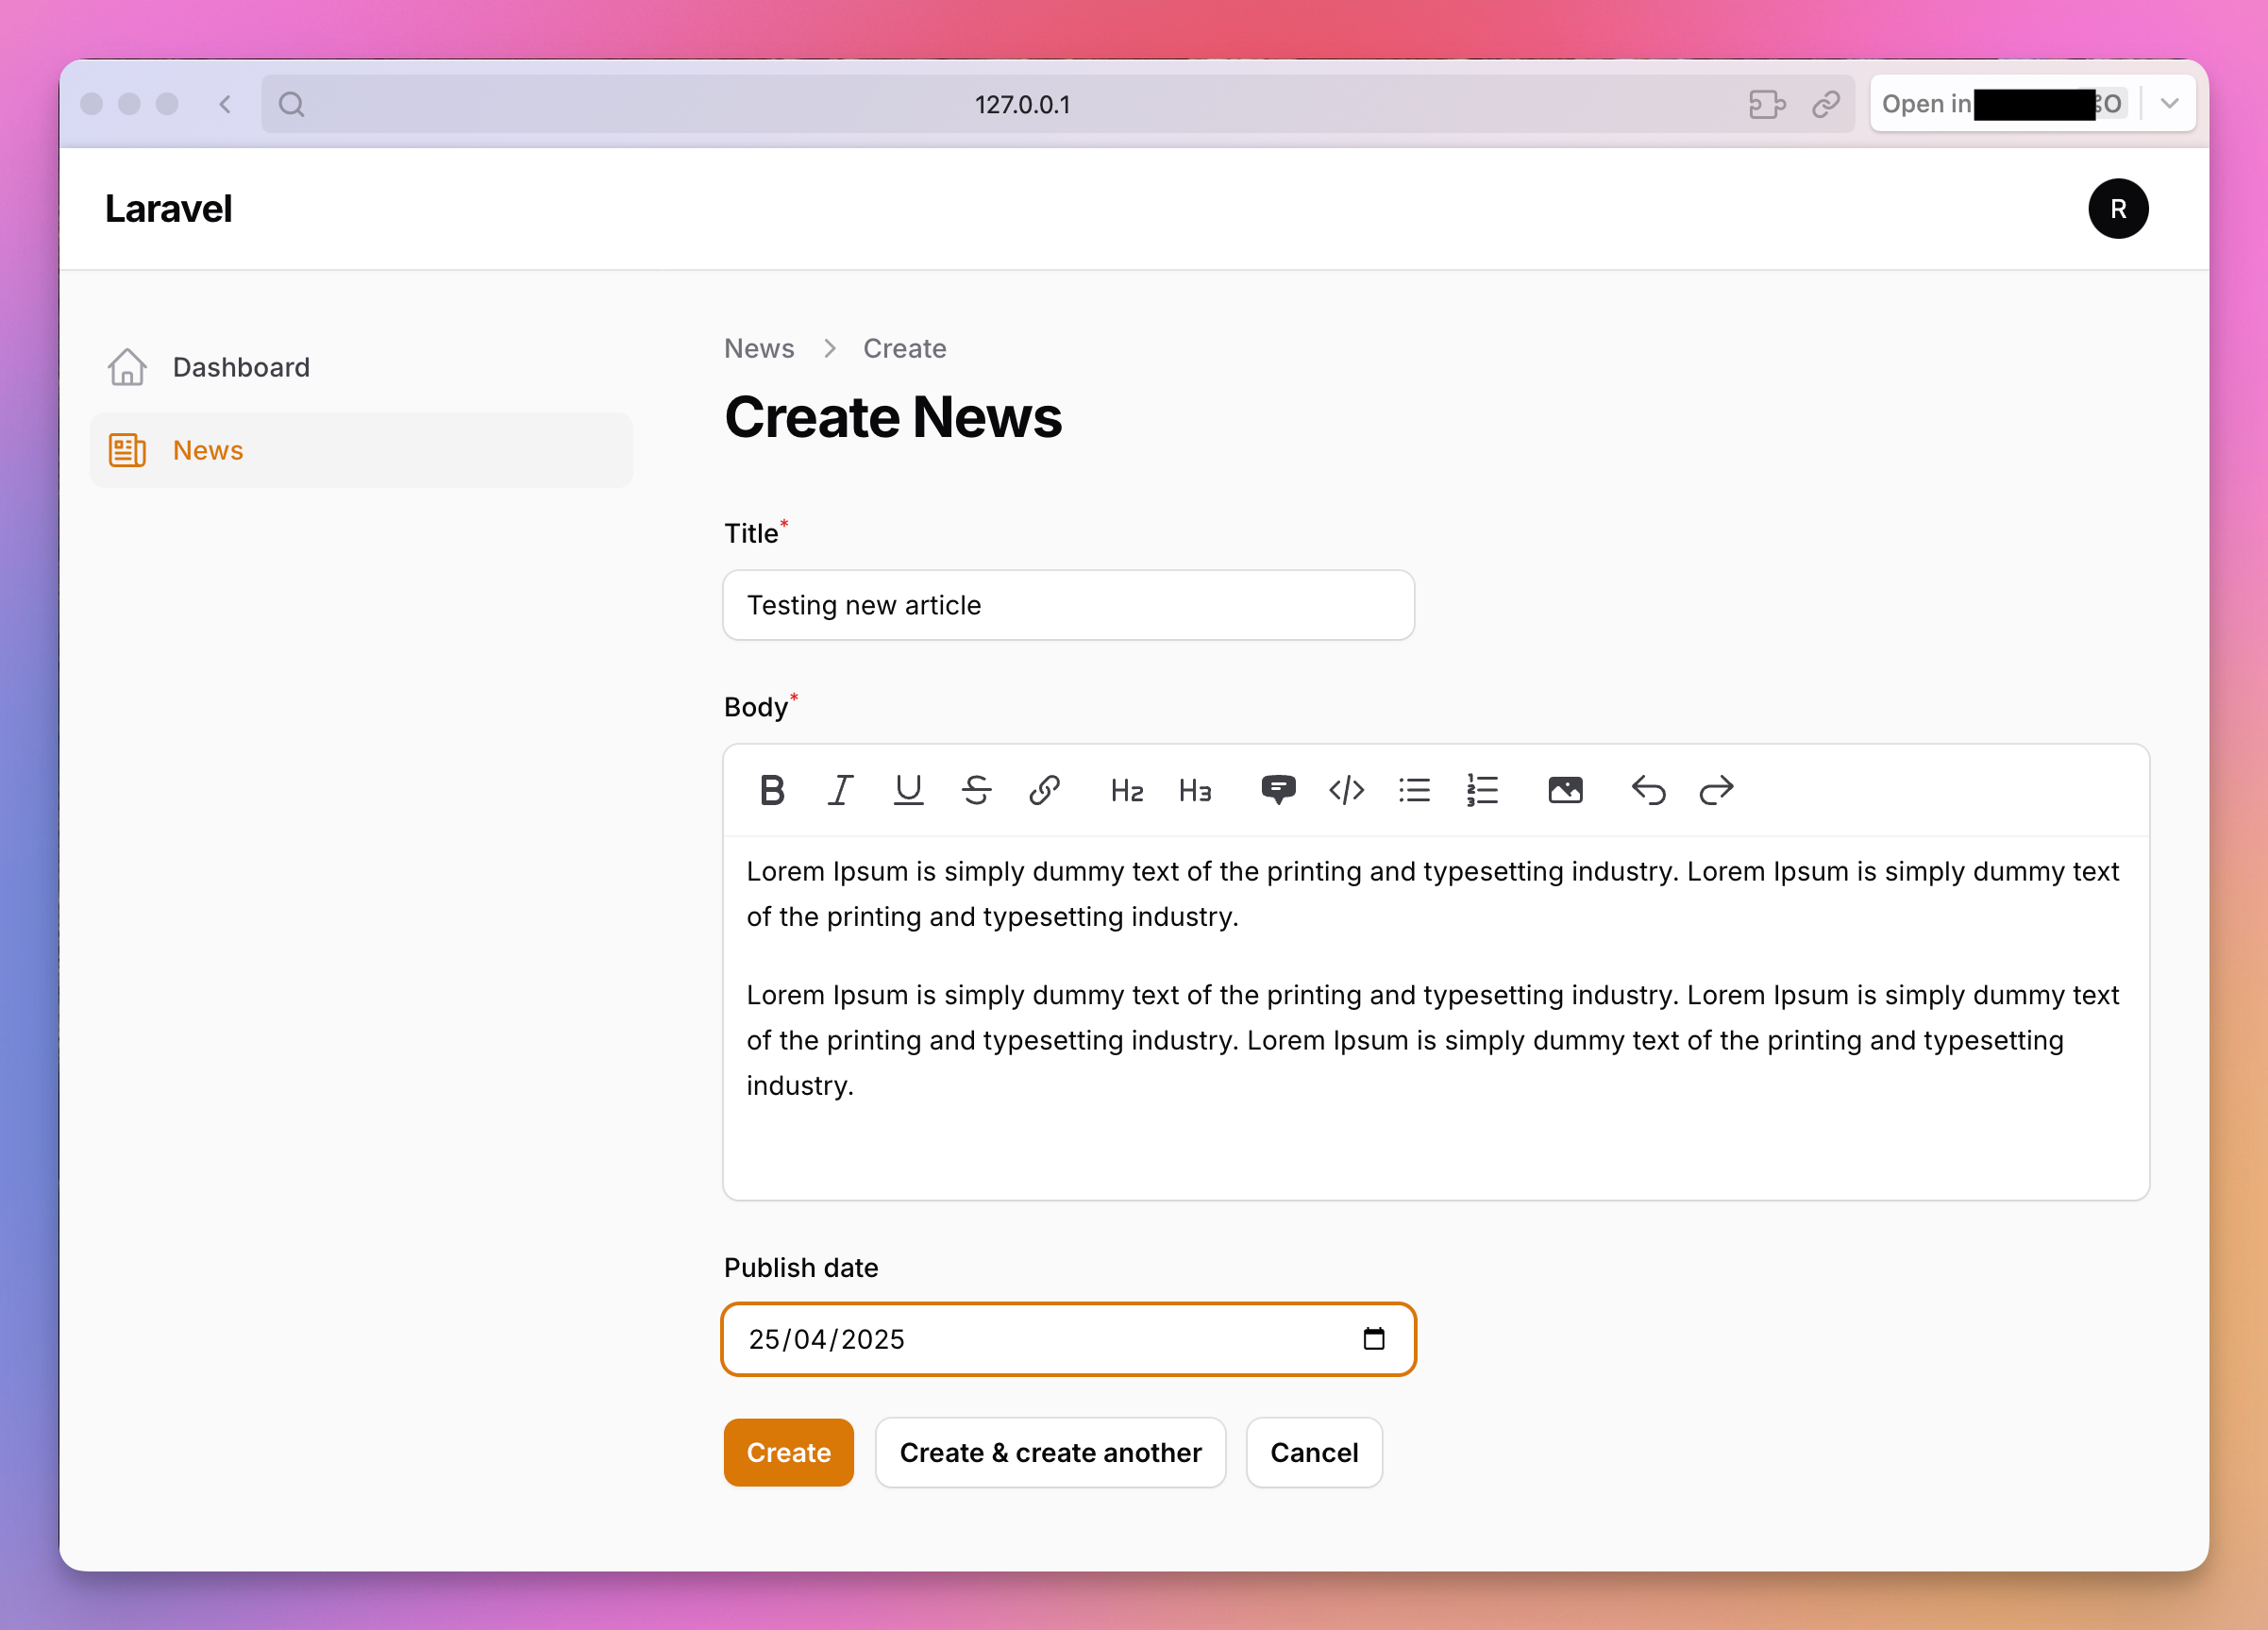
public static function form(Form $form): Form
{
return $form
->schema([
Forms\Components\TextInput::make('title')
->required()
->maxLength(255),
Forms\Components\RichEditor::make('body')
->required()
->columnSpanFull(),
Forms\Components\DatePicker::make('publish_date')
->nullable(),
]);
}
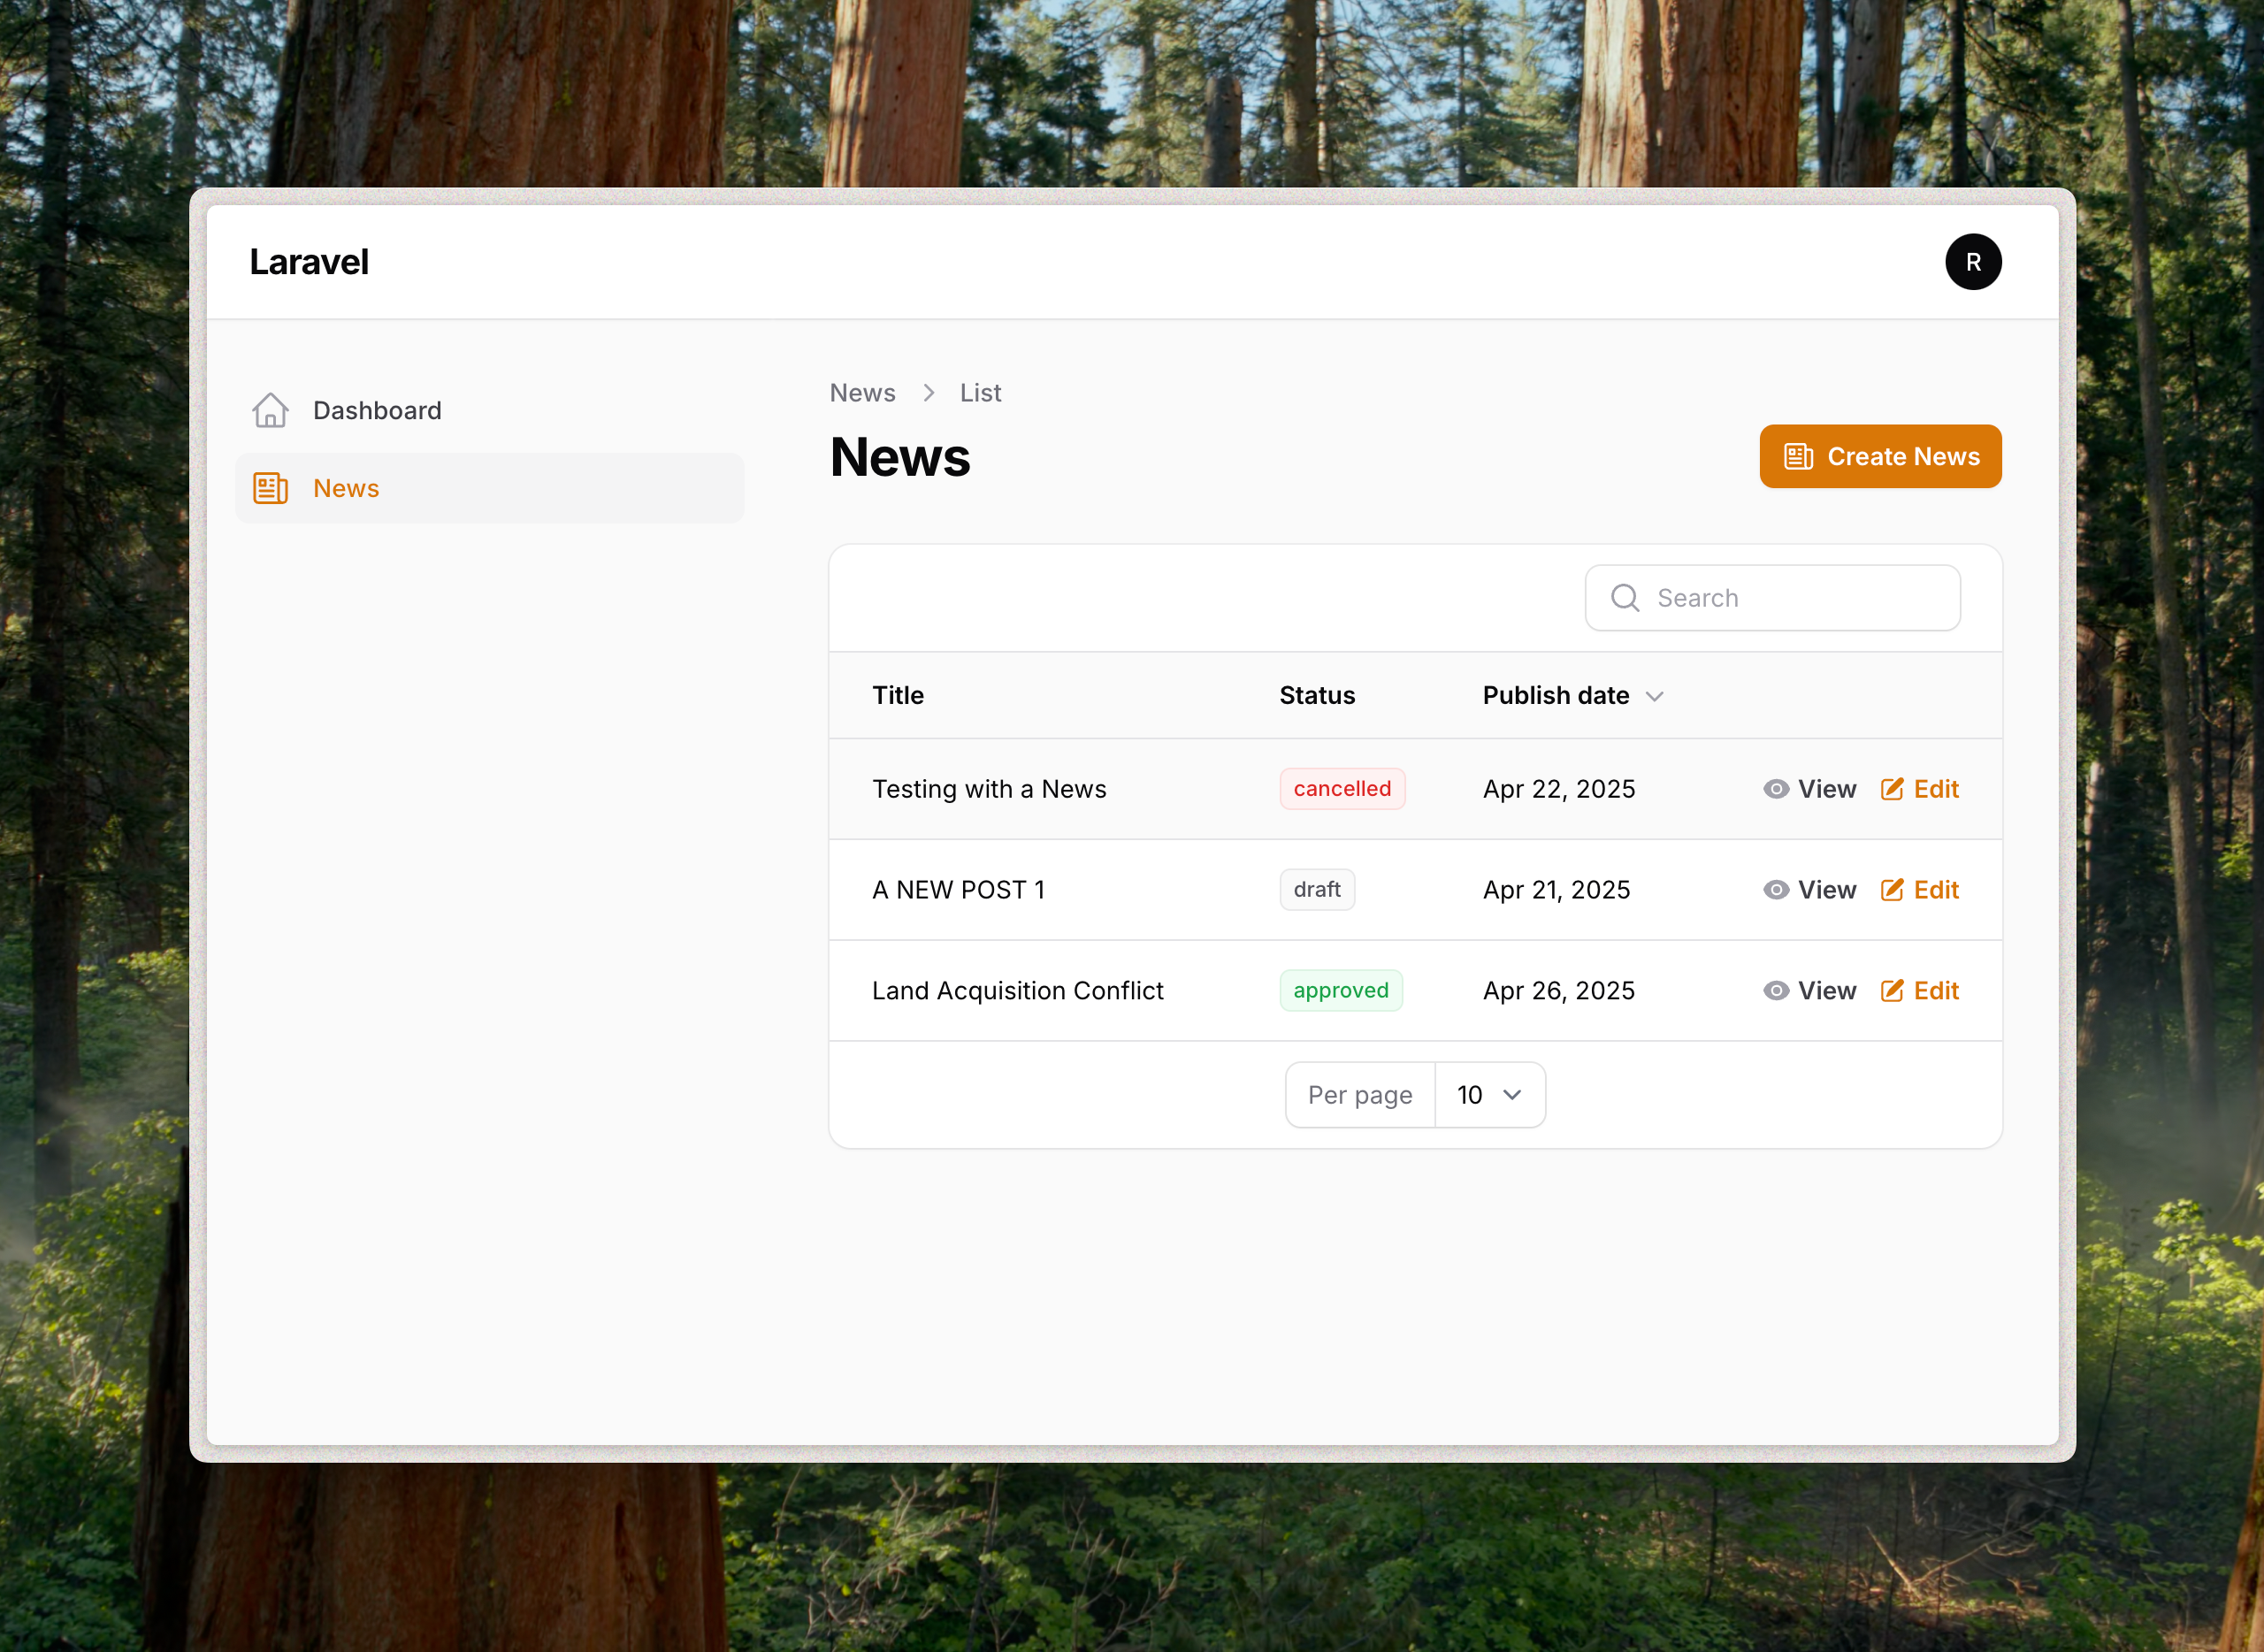
public static function table(Table $table): Table
{
return $table
->columns([
Tables\Columns\TextColumn::make('title')
->searchable(),
Tables\Columns\TextColumn::make('status')
->badge(),
Tables\Columns\TextColumn::make('publish_date')
->date()
->sortable(),
])
->actions([
Tables\Actions\ViewAction::make(),
Tables\Actions\EditAction::make(),
]);
}
public static function getPages(): array
{
return [
'index' => Pages\ListNews::route('/'),
'create' => Pages\CreateNews::route('/create'),
'edit' => Pages\EditNews::route('/{record}/edit'),
'view' => Pages\ViewNews::route('/{record}'),
];
}
}At this point, you should have a working CRUD interface for News articles. Make at least 2 users for different roles.
php artisan make:filament-user --name=Editor [email protected] --password=123456
php artisan make:filament-user --name=Reporter [email protected] --password=123456
Set their roles in database. Then go to panel login (http://localhost/admin/login) page to login. Test it out by creating a few news items.

Step 4: Installing State Machine Package
Let’s move forward to the interesting steps.
Now, let’s add the state machine functionality. Start with installing the State Machine package:
composer require asantibanez/laravel-eloquent-state-machinesPublish and run the migrations.
php artisan vendor:publish --provider="Asantibanez\LaravelEloquentStateMachines\LaravelEloquentStateMachinesServiceProvider" --tag="migrations"
php artisan migrate
Step 5: Creating the State Machine
This package uses StateMachine classes to define the flow of states and transitions. Create a new state machine class using the command provided by the package:
php artisan make:state-machine MakerCheckerStateMachineNow update the class to define our states and transitions. In the transitions() method we will define the allowed transitions as a 2D array. Where the keys are “FROM” states and the values arrays are the list of “TO” state. Empty array as the value means there is no next step. Also we’ve set draft as the default state in defaultState() method.
<?php
// app/StateMachines/MakerCheckerStateMachine.php

namespace App\States;

use Asantibanez\LaravelEloquentStateMachines\StateMachines\StateMachine;
use Illuminate\Support\Facades\Auth;
use Illuminate\Support\Facades\Validator;

class MakerCheckerStateMachine extends StateMachine
{
    public function recordHistory(): bool
    {
        return true;
    }

    public function transitions(): array
    {
        return [
            'draft' => ['submitted', 'cancelled'],
            'submitted' => ['approved', 'rejected', 'cancelled'],
            'rejected' => ['submitted', 'cancelled'],
            'approved' => ['published'],
            'cancelled' => [],
            'published' => [],
        ];
    }

    public function defaultState(): ?string
    {
        return 'draft';
    }
}
Step 6: Updating the News Model
Update the News model to use the state machine. We need to define a $stateMachines array that will map state fields to the StateMachine definitions:
<?php
// app/Models/News.php

namespace App\Models;

use App\StateMachines\MakerCheckerStateMachine;
use Asantibanez\LaravelEloquentStateMachines\Traits\HasStateMachines;
use Illuminate\Database\Eloquent\Model;

class News extends Model
{
    use HasStateMachines;

    // ... $fillable, $cast etc. remains unchanged ...

    protected $stateMachines = [
        'status' => MakerCheckerStateMachine::class,
    ];
}
NOTE: A model can use multiple state fields to map with different StateMachine classess. Also, the StateMachine classes are not Model specific. That means, we can use the same MakerCheckerStateMachine class to any model that we want to maintain the same workflow.
Step 7: Implement the workflow operations
Now, to utilize this StateMachine to control our Model status, we need a few things to do:
- In the list page of News articles, need to display the status column with appropriate color
- In the view page of a News, we need to place some action buttons that will take the News to the desired, allowed state.
- If attempting to reject
As we have plan to use this workflow with many other Resources, let’s build these functionalities in a trait. So that we can compose them with any Resource that requires the same workflow.
<?php
// app/Filament/Resources/MakerCheckerWorkflow.php
namespace App\Filament\Resources;
use Illuminate\Support\Facades\Auth;
use Filament\Actions\Action;
use Filament\Forms\Components\Textarea;
use Illuminate\Support\HtmlString;
use Asantibanez\LaravelEloquentStateMachines\StateMachines\State;
trait MakerCheckerWorkflow
{
public function currentStatus(): State
{
return $this->getRecord()->status();
}
public function getWorkflowHeaderActions(array $actions = []): array
{
$user = Auth::user();
$record = $this->getRecord();
$status = $record->status();
if ($user->role == 'reporter') {
if ($status->canBe('submitted')) {
$actions[] = Action::make('submit')
->icon('heroicon-m-paper-airplane')
->color('success')
->requiresConfirmation()
->modalHeading('Are you sure to Submit?')
->modalDescription(new HtmlString("An admin will review and approve your submission. <br /> He may get back to you if any changes are needed."))
->action(fn () => $record->status()->transitionTo('submitted'));
}
}
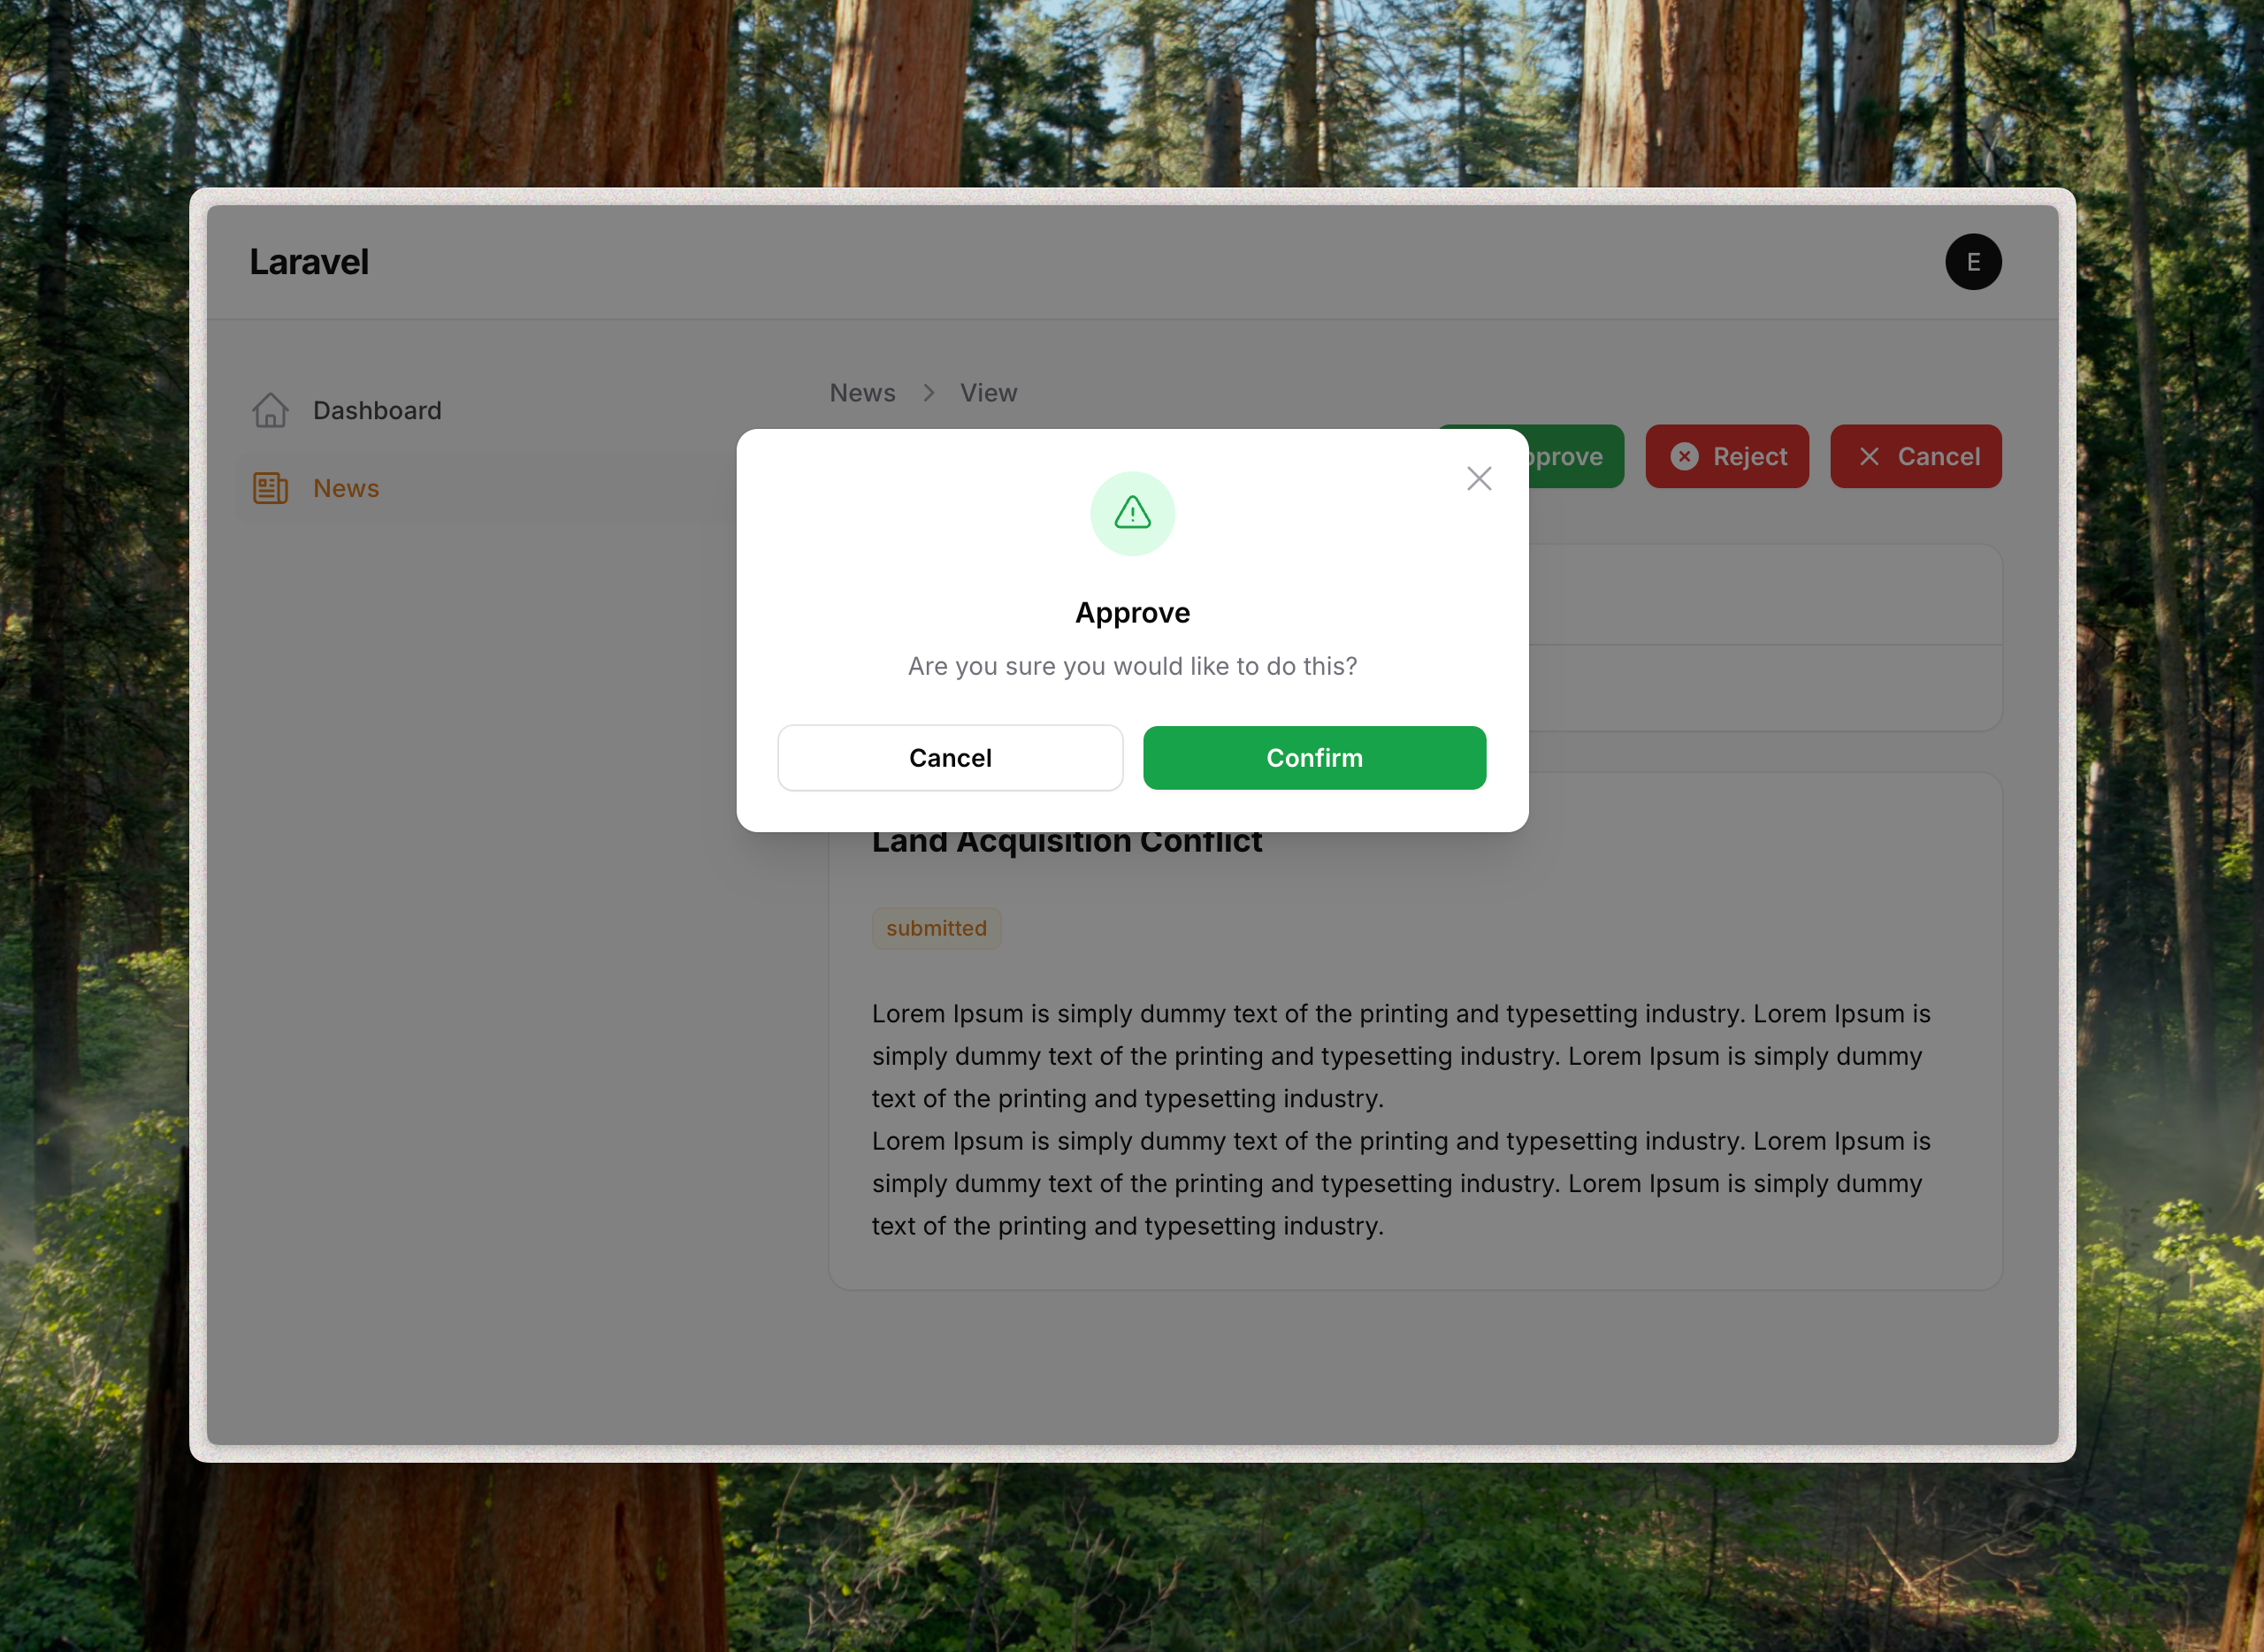
if ($user->role == 'editor') {
if ($status->canBe('approved')) {
$actions[] = Action::make('approve')
->icon('heroicon-m-check')
->color('success')
->requiresConfirmation()
->action(fn () => $record->status()->transitionTo('approved'));
}
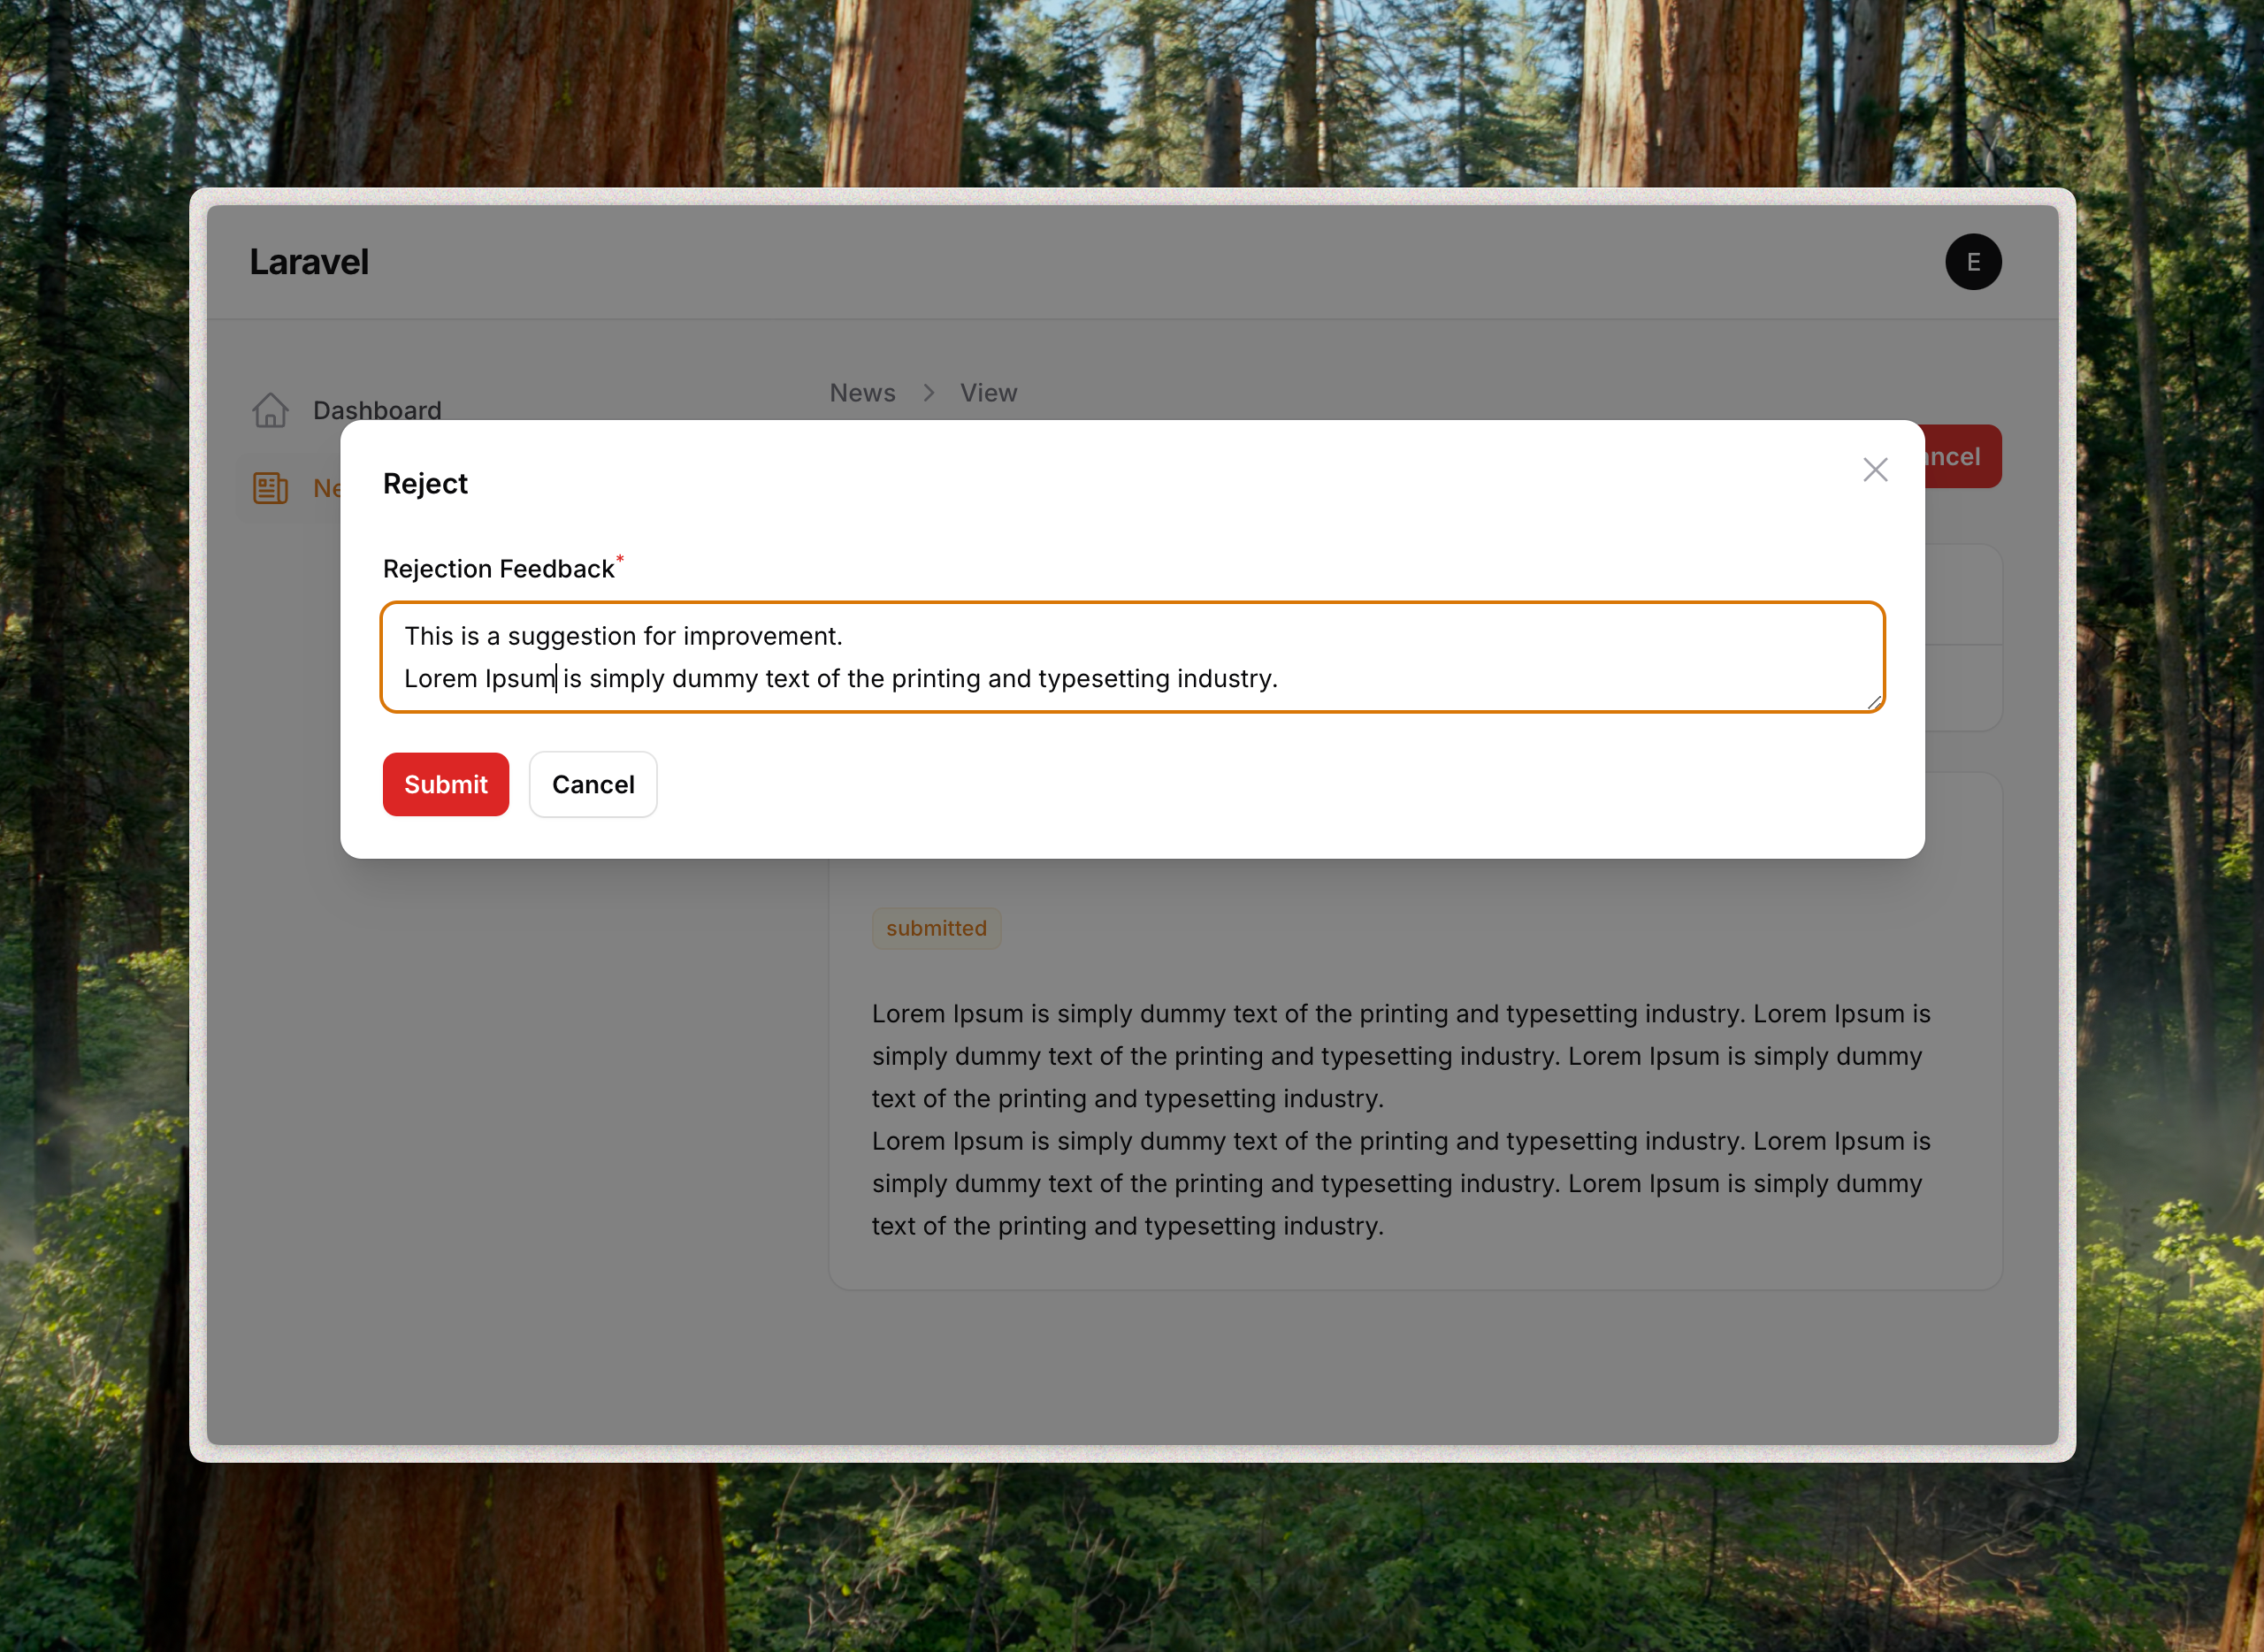
if ($status->canBe('rejected')) {
$actions[] = Action::make('reject')
->icon('heroicon-m-x-circle')
->color('danger')
->form([
Textarea::make('feedback')
->required()
->label('Rejection Feedback'),
])
->action(function (array $data) use ($record) {
$record->status()->transitionTo('rejected', [
'feedback' => $data['feedback']
]);
});
}
if ($status->canBe('published')) {
$actions[] = Action::make('publish')
->icon('heroicon-m-check')
->color('success')
->requiresConfirmation()
->action(fn () => $record->status()->transitionTo('published'));
}
}
if ($status->canBe('cancelled')) {
$actions[] = Action::make('cancel')
->icon('heroicon-m-x-mark')
->color('danger')
->requiresConfirmation()
->action(fn () => $record->status()->transitionTo('cancelled'));
}
return $actions;
}
public static function getStatusBadgeColor($stateName): string
{
return match($stateName) {
'draft', 'archived' => 'gray',
'submitted' => 'warning',
'success', 'approved' => 'success',
'rejected', 'cancelled' => 'danger',
default => 'info',
};
}
}
So, what are we baking here?
- A few helper methods for getting current status, getting a consistent color per status etc.
getWorkflowHeaderActions()function to make header action buttons to for performing transitions.- If the News is about to be rejected – we’re asking the Editor in a popup for a reason for rejection or a suggestion of what needs to be improved.
Step 8: Updating the News Resource
Update the News resource now to use the functionalities we’ve prepared right above. After useing the trait, we can use the getStatusBadgeColor() function to set appropriate color for the status badge.
Also, a News should not be listed for other then the creator untill it’s submitted. So let’s use modifyQueryUsing()to filter the records in list page.
// app/Filament/Resources/NewsResource.php
<?php

namespace App\Filament\Resources;

use App\Filament\Resources\MakerCheckerWorkflow;

class NewsResource extends Resource
{
    use MakerCheckerWorkflow;

    // ... rest of the resource code ...

    public static function table(Table $table): Table
    {
        return $table
            // Add record filtering for hiding drafts from others
            ->modifyQueryUsing(fn ($query) => $query
                ->where('created_by', Auth::user()->id)
                ->orWhereNotIn('status', ['draft', 'cancelled'])
            )
            ->columns([
                // ... existing columns ...
                // Remove: Tables\Columns\TextColumn::make('status')
                    ->badge()
                Tables\Columns\TextColumn::make('status')
                    ->badge()
                    ->color(fn (string $state): string => self::getStatusBadgeColor($state)),
            ]);
    }
}
Step 9: Creating the View Page
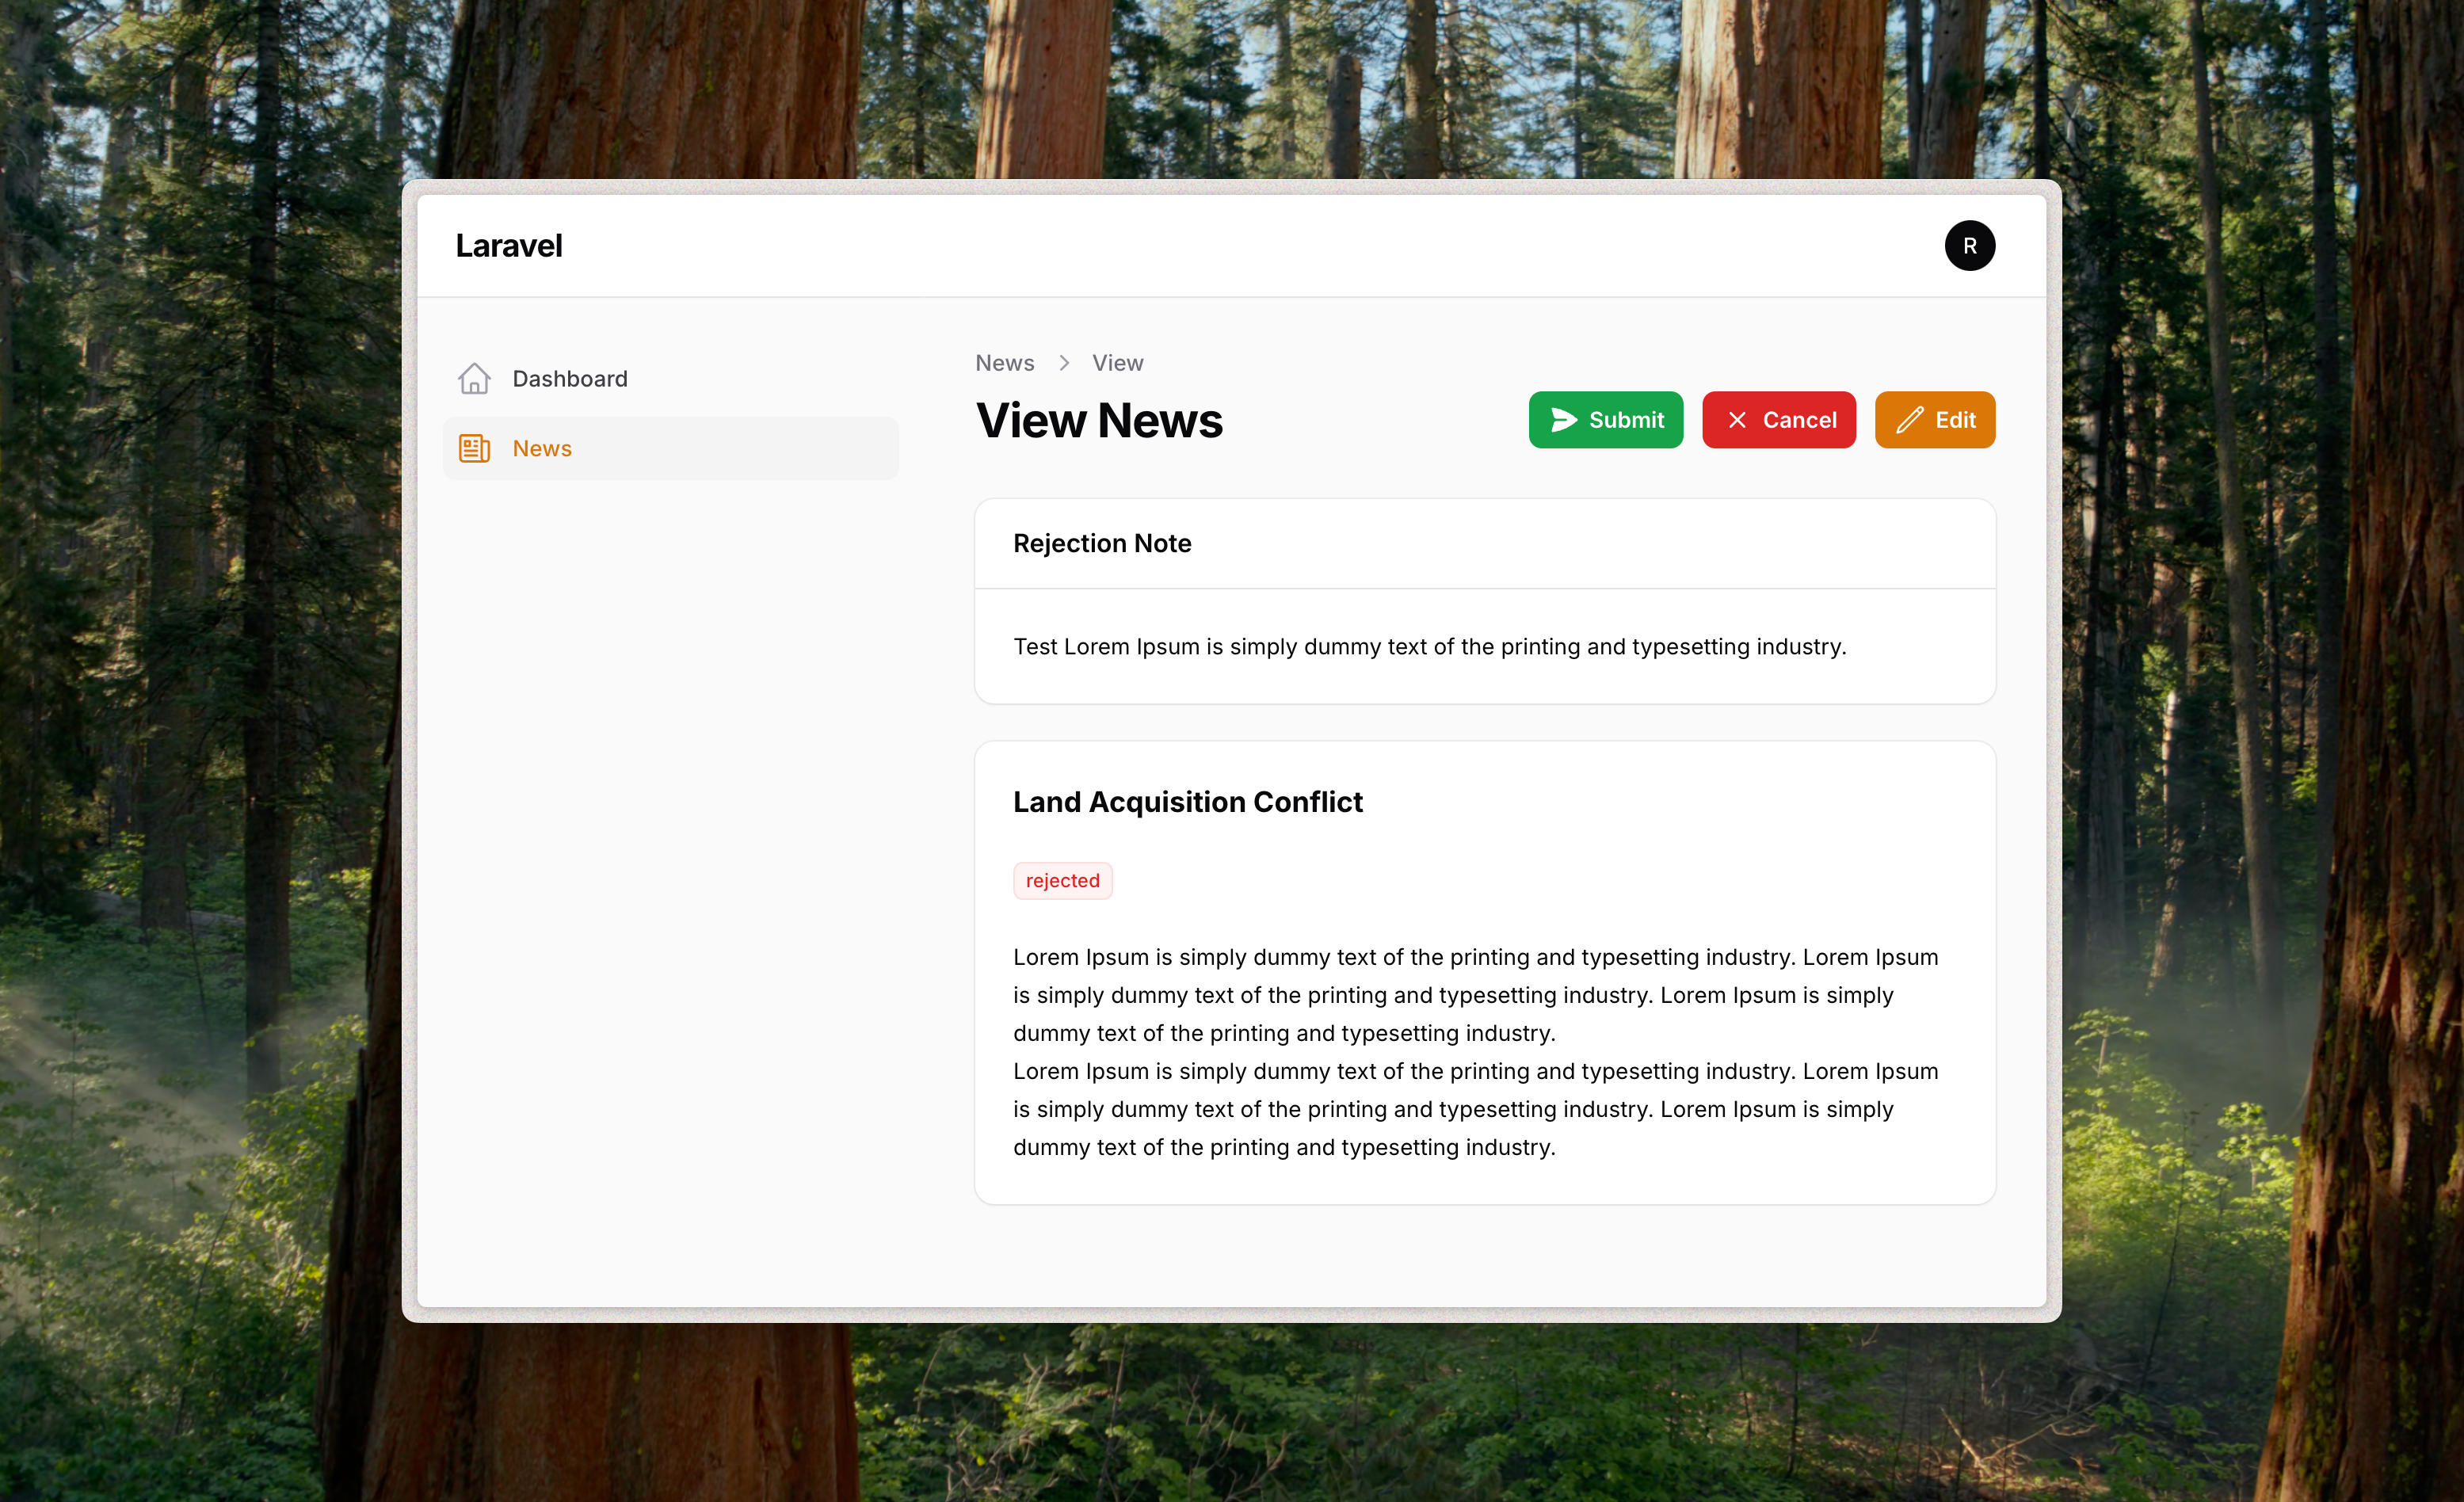
Then, use the trait in ViewNews page and use the header actions to give the user option to take the News to the next step. Additionally, add the Edit Action for the reporter if in draft or rejected state.
Also, let’s use Filament InfoList to make the view page a little comfortable for the reviewer.
<?php
// app/Filament/Resources/NewsResource/Pages/ViewNews.php

namespace App\Filament\Resources\NewsResource\Pages;

use App\Filament\Resources\NewsResource;
use Filament\Resources\Pages\ViewRecord;
use Filament\Infolists\Infolist;
use Filament\Infolists\Components\Section;
use Filament\Infolists\Components\TextEntry;
use App\Filament\Resources\MakerCheckerWorkflow;
use Filament\Actions\EditAction;
use Filament\Support\Enums\FontWeight;
use Filament\Infolists\Components\TextEntry\TextEntrySize;
use Illuminate\Support\Facades\Auth;

class ViewNews extends ViewRecord
{
    use MakerCheckerWorkflow;

    protected static string $resource = NewsResource::class;

    protected function getHeaderActions(): array
    {
        $actions = $this->getWorkflowHeaderActions();

        if ($this->canEdit()) {
            $actions[] = EditAction::make('edit')
                ->icon('heroicon-o-pencil');
        }

        return $actions;
    }

    public function infolist(Infolist $infolist): Infolist
    {
        return $infolist
            ->schema([
                Section::make()
                    ->schema([
                        TextEntry::make('title')
                        ->columnSpanFull()
                        ->weight(FontWeight::Bold)
                        ->size(TextEntrySize::Large)
                        ->hiddenLabel(),
                        TextEntry::make('status')
                            ->badge()
                            ->color(fn () => self::getStatusBadgeColor($this->record->status))
                            ->hiddenLabel(),
                        TextEntry::make('body')
                            ->html()
                            ->columnSpanFull()
                            ->hiddenLabel(),
                    ]),
            ]);
    }

    private function canEdit(): bool
    {
        return Auth::user()->role == 'reporter'
            && in_array($this->currentStatus()->state, ['draft', 'rejected']);
    }

}
Seems like we’re done! Let’s try it out. 😎
Step 10: Testing the Workflow
Using the “editor” and “reporter” users we’ve created earlier, let’s test our Maker-Checker flow. We’ll check both – the approval and rejection flow.
- As a reporter:
- Create 2 new News articles as (status:
draft) - Submit the articles for review
- View the status change to
submitted
- Create 2 new News articles as (status:
- As an editor:
- Review the submitted News
- Approve the first article
- See the “Publish” action is now available
- Reject the second article with a suggestion.
- As a reporter again:
- Review the
rejectedNews and see if you see the suggestion. - Edit the News and submit again.
- Review the
- As the Editor again:
- Review the re-submitted News and approve it.
Quick Recap
So, with very minimum effort, we’ve implemented a Make-Check approval flow with the following features:
- Status badges with appropriate colors
- Role-based action buttons
- Feedback form for rejections
- Confirmation modals for important actions
- Automatic state validation
And, we have designed the workflow with the following Transitions:
- Reporter: draft → submitted, draft → cancelled
- Editor: submitted → approved, submitted → rejected
- Reporter: rejected → submitted (after making changes)
- Editor: approved → published
We have used the Laravel Eloquent State Machine package for maintaining the state transitions. And utilised Laravel Filament v3 for building the application UI and CRUD panel.
The complete code is available in this GitHub repository, and you can clone it to play around the code.
Next Steps
- Add validation rules for transitions – e.g., feedback is required for rejection.
- Implement email notifications
- Implement the StateMachine for other Models.
- Check advanced features like adding hooks and query building around the states and state history.
This step-by-step approach helps you understand each component of the maker-checker workflow and how they work together. You can now extend this basic implementation with additional features as needed.
Happy Coding! 🤗